Tuesday, September 20, 2011

Book Review: Before I Go To Sleep by S. J. Watson

Pros: sympathetic protagonist, good pacing, tension builds to a strong climax

Cons: some plot twists are predictable

Every morning Christine Lucas wakes up next to a stranger: her husband, Ben.  An accident has robbed her of the ability to remember the past 20 years and to retain new memories.

She quickly discovers she has been keeping secrets from Ben, in the form of Dr. Nash, a doctor trying to help her regain her memories and a diary she's been keeping for the past few weeks.  A diary that has, 'DON'T TRUST BEN', scratched into the front page. 

This was a quick read that pulls you in from page one.  The plight of a woman who has no idea who she is, who learns things each day and then forgets everything, is gut-wrenching.  

Ben is alternately a sympathetic and sinister character.  Christine discovers he lies to her, but isn't sure if it's to keep her from feeling grief over the events of the past or for another purpose.

I was able to guess a few things that would happen, but the climax was strong and contained a few twists I didn't predict.

Saturday, August 06, 2011

Silhouette SD In Use

It's taken a bit of time to get used to the software - I'm not the most photoshop literate - so I haven't made any full Silhouette cards until now.  Yesterday I created a lily of the valley design (2 leaves, 3 stems and 16 flowers), cut them out and made a card.  I also cut a frame for the inside birthday congratulations.

So, how does the Silhouette work?  You create/open/download your design, resize it and lay out the pieces you want cut (pieces you want cut from other papers can be put off to the side of the cutting area).

Load your media (ie, put the paper onto the sticky carrier plastic and put it under the runners on the machine),


then send the design to the machine once you've specified your settings.  In this picture you can see the green frame I'm cutting, while at the bottom, the center of the frame (in purple) won't be cut.


Cut your shapes, peel them off the backing and use.  The knife will score into the backing sheet (you can see the frame in the plastic if you look closely), so be sure to use the correct one (along with the correct knife and cutting settings).


And here's the card I made:


And if you're curious about what it sounds/looks like when cutting, here's a short example:

Friday, August 05, 2011

Silhouette SD - Digital Cutting Tool

I've been busy lately and haven't had the chance to blog about the awesome birthday present my husband got me: the Silhouette SD.  It's a craft cutting system that allows you to design your own shapes to cut.  This means you can cut ANYTHING you can draw (or find a shape file for, scan in and trace, etc.).  You can resize shapes, use any font on your computer and more.

So, what's in the box?  You get the machine, 2 cutting mats (for different thicknesses of materials), 3 blades (again, for different thicknesses of materials), the design software (now Mac compatible!), an instructional video on CD-Rom, 48 designs (with 50 included in the design software to get you started), a start up guide book and a $10 giftcard for their online store (for buying designs).  And all your cords (power & usb).

While not particularly noisy it's also not a quiet machine.  It's surprisingly melodic as it cuts designs.  They come out crisp and professional - just watch how you reuse pre cut paper (I've tried to reuse larger paper from which I've cut designs only to have it catch while being pulled into the machine, knocking it out of synch).

Friday, June 24, 2011

Credit Valley Explorer Tour

I don't know how my husband finds these things, but for my birthday he took me on a Credit Valley Explorer train ride.  The train has grouped 4 person seating (so two of you go backwards each way) and has riders swap sides at the halfway point so everyone gets to see out both sides of the train.  It also includes a 'light' lunch and drink service.  The tour starts in Orangeville and goes south towards (but not reaching) Brampton.


After passing several golf courses, the train goes around forest and then farm land.  We saw a surprising number of animals, specifically horses and cows.

There's even a nice waterfall.  The train slows down a strategic spots to aide in the enjoyment of the view.  Much to my surprise, they also served desert!


It's a fun tour and a great way to spend an afternoon.  They run tours throughout the year, but I imagine the fall tours are packed.

Friday, June 10, 2011

The Mini Bonsai Kit

Everything that comes in the box.
A few years back I got a mini bonsai kit for Christmas.  It's been sitting in its box in my office since, as I waited for a time when the bookshelf in my office - one of the few places in the house that gets sunlight without fear of cats eating the plants or playing in the dirt - freed up.  I've been using the spot for my winter herb garden, but now that the herbs are outside I decided to see how this kit worked.  I was all ready to plant to seeds last week, when I read the instructions.  Apparently the seeds need to be soaked in water for 24 hours, then given 7 days of cold stratification.

Now that that's taken care up, I was able to soak the soil pellet so it expanded, and, finally, plant the seeds. It's now sitting in the sun.  Hopefully in a few days I'll see some sprouts and in a year or so I'll have a mini bonsai tree!

Wednesday, June 01, 2011

Library Day

I've been hearing all sorts of doom and gloom stories on the internet lately about how libraries are defunct and should be closed.  Of course, not everyone agrees that it's the right thing to do, myself included.

My local branch was closed for over a year.  I got by by going to a further branch and trying to wait for my holds all to arrive before going so I wouldn't have to make the trek so often.

Well, I'm happy to report that my local branch has reopened today.  Given all the talk about the usefulness of libraries (that everyone's using the internet at home for research and ebooks are cutting the need for paper books, etc.) I expected the place to be pretty empty.  I mean, aside from myself, who would be anxiously waiting for the library to open again?

Apparently quite a lot of people.  The library was packed.  There were adults on the computers, youth in the youth section talking about OSAP and universities and how to pay for school when you can't find a job.  The magazine section had lots of comfy chairs and a fake fireplace, where I sat to browse my findings.  I heard students studying at a nearby table and saw parents getting their children books.

And the staff were ecstatic, welcoming everyone back to the library, raving about the renovations and dishing out suggestions for books as well as computers.

As I walked home I realized something.  For all the home computers, for all the advances in ebooks, for all the other things that take up our limited spare time, I've never yet been to a library that was empty.  We take for granted the free access to computers, books and professional help libraries offer.  If we're not careful, someday our descendants won't have that luxury.

Friday, April 22, 2011

Stamping

I picked up a lot of new stamps and equipment at the Creativ Festival, so I figured I'd try them out.  The Local King Rubber Stamps booth had a great demonstrator showing off their stamps.  Unlike regular stamps that give an outline which you then colour in, these stamps are designed to be coloured on, so the colours are blended on the stamp to create great images on their glossy paper.  Alas, I should know better than to believe things are as easy as expo demonstrators make them out.  They said you can use any markers, which is true - to a point.  I bought some water based markers at another book (Stampin' Up) and some Copic markers to fill in the colour gaps from the set.  Now, Copic markers are alcohol based, which means they dry faster than water based when applied to stamps, and the colours don't wash off.  (You can tell I'm new to the idea of colouring directly on the stamps.  It never occurred to me to make sure the markers weren't permanent before I used them.)

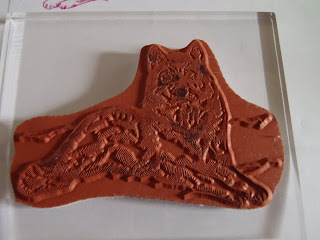
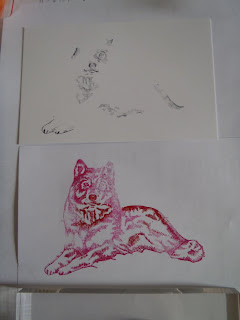
Here's what my stamp looked like when I was done trying to do my first picture.  You can still see the black marker around one eye and the nose.  That's all that made the glossy paper (see the stamp below).

So I did an experiment.  I used the same stamp and tried it with my water based markers (the pink/red wolf).  Much better, but not quite what I want in a wolf.

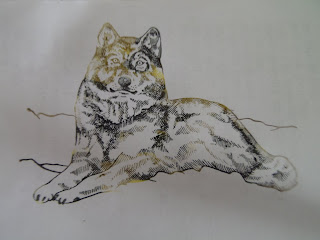
So I tried a third attempt.  I used some cheap dollar store markers, the yellow, orange, brown and black (you always want to go light to dark or you'll ruin your markers).  Not bad, but not quite card quality either.  I'll have to invest in another set of water based markers, with earth tones (rather than the colour set I got, which should be great for birds, butterflies and flowers).  I still noticed that the lighter colours had faded by the time I stamped the card.  Maybe that's why the demonstrator emphasized that you don't have to look at what you're doing when you colour.  You colour faster that way and end up with more ink still on the stamps when you stamp your page.

Compare that with the results of the rose stamp I got at the Stampin' Up booth.  I used pigment dyes I bought as a 4 set (2 reds, green and gold) at another booth (I don't remember which booth this was, though I suspect it was either Art Tales or Memory Keeper.  I bought a bunch of stuff there, including the Vanilla Smooch Spritz used to give the finished card a sparkly sheen).  

My rose set is designed to have each picture stamped twice, once for the base, and again for the highlights.  It was quick and easy and worked perfectly both times (though with the stamps having wood backing you have to watch your placing carefully or they won't line up).  I did the main rose twice, then layered it over the sparkly background.
I'm hoping with practice I'll get better with the marker stamps.  When done well they look fantastic.

A few hours after doing this post (set to publish the following day), I decided to do a search for the marker tip sheet the woman at Stampin' Up said she'd send me if I emailed.  I was correct in thinking the search would be easier.  And I found it.  It's a pdf file you can download here. (Or you can do a search for "Stampin Up marker tip sheet", it's the fifth result).  The first result, Using Markers - Stampin' Up is the one that taught me the best tip though:
3. Breathe on the inked image to remoisten the ink before stamping onto paper. 
Such an easy trick!  And it works.  So you don't have to colour fast to get good inked images.  Just breathe on the stamp to make the ink wet again.  I tried a few of my stamps to practice.  Here are the results.  Much better.  Now I just need black, grey and earth tone water based markers and I'm in business.   :)

Thursday, April 21, 2011

Creativ Festival Report

So, I went to the Creativ Festival in Mississauga on the weekend.  There were a decent number of booths with a variety of focuses - knitting, crocheting, stamping/cardmaking/scrapbooking, seweing maching embroidery and more.  The free classes weren't as good as I'd hoped, but I did have fun at the one make 'n take class I went to (where I made the 'laugh' card in the 'things I bought' photo).


One of the coolest things there was a booth demonstrating the Turkish art of Ebru.  For $7 you could try it and take your piece home.  Here's the one I did:

Ultimately I had a good two days, and came away with some new techniques.

Thursday, April 14, 2011

Creativ Festival

I'm heading to the Crativ Festival this Friday and Saturday.  Should be a ton of fun.  I hope to learn a bunch of new sewing and card crafting tricks.  :)  I'll try to post some photos next week.

Wednesday, April 13, 2011

Sewing Book Review: Illustrated Guide to Sewing: Garment Construction, edited by Peg Couch

Pros: step-by-step colour photos for everything, left and right handed instructions for hand sewing, progresses through basics to quite advanced techniques

Cons: some later instructions may be hard to follow without referring to the accompanying photos and even the glossary

The Illustrated Guide to Sewing: Garment Construction is a great guide for beginner and intermediate sewers who want to give their sewing a more professional look.  It starts with the basics, touching briefly on some machine and hand sewing techniques, fabric preparation and essential notions.  It assumes some knowledge and suggests reading through your sewing machine guide if you're a complete beginner before starting with this book.

This book teaches garment construction specifically.  From the hand stitching techniques of basting (to check fit before sewing) to hemming, the book moves on to the correct construction order for garments and then to professional style finishing techniques.

Each set of instructions is accompanied by a series of full colour photographs with the different steps numbered for reference.  The photos certainly help with clarity.  Actual beginners will find themselves flipping to the glossary at the back of the book and to earlier sections where some procedures are given in more detail.  I imagine many of the techniques taught (as with everything skill related) take time and practice to master.

The book recommends taking extra time with pre-sewing adjustments to ensure that you only sew once to create flattering, well constructed garments.  And this is certainly a great book to help you achieve your sewing goals.

Friday, March 25, 2011

Hemming Pants

I have that 'lucky' body type whereby I can either fit clothes to my waist or my height.  Ultimately I choose waist (of course) and end up hemming all my pants to make them shorter.  I remember, once, finding a pair of jeans that fit perfectly when I tried them on.  No adjustments necessary.  Alas, that's not the norm, so off to hem them I go.

I had no idea there was a tool designed to help you hem pants.  I'd always worn them to measure how much material needed to be cut and hemmed for the pants to fit right, remeasured after taking off the pants, pinned the line, drawn a line to cut on, cut the excess, then measured, pinned, invariably pinned the wrong side of my pants, pinned again, turned under the hem and pinned one last time.  Finally, the easy part: sewing.  After an hour or more my pants would be hemmed and I'd be annoyed enough that I'd avoid hemming another pair for as long as I could.

But I was looking at sewing notions a few days ago and came across this: it's called a sewing and knitting gauge and it cost $1.20.

And I just happened to have a pair of pants ready to be hemmed.  I put the pants on and pinned up the sides, so I knew where to begin, then I got out my new tool.  There's a plastic slier you put to the measurement you want, then you stick it inside the groove and make sure the fabric is the same height all around using that measurement.  It was very fast and required no pins.

I then decided where to cut for the hem, and used the measurements on the side of the tool to mark a pencil line for cutting.


After cutting, it was again easy to set the hem line, then turn down and pin the fabric.  This is the second point where pins were needed, rather than the third or fourth.


In a fraction of the time it would normally take me to hem pants, these were done!


Friday, March 11, 2011

Punta Cana - Spa and Entertainment

The Spa at the Majestic Elegance is very beautiful. You have to walk off the main resort, across a bridge of naturalistic swampland to get there. The front had a few lounge chairs and a large Buddha statue. Reception was tastefully decorated and had a metal staircase leading to the massage rooms.

As I said in my first post on Punta Cana, the overbooking of the hotel let to our being given a $100 spa credit. So I got a 55 minute aromatherapy massage. The room had 2 massage tables, sink and shower. The massage itself was amazing.


After it was done, I headed downstairs to go to the other half of the spa. Here they have a series of pools (hot, cold, jetted), a hot stone chair, steam room, sauna, aromatherapy room and nifty showers (each stall had a different shower, like a pull cord bucket and wall jets).

We attended one of the many bingo games (my husband won a bottle of rum, which we traded for a CD of local music), I did a karaoke number (Walk Like an Egyptian) and went to a few of the evening shows.


If you're in the area and have the chance, two shows were definitely worth it: The Michael Jackson show and Circus Chan-Chi. They had a few trapeze artists, a guy who balanced various things on his head, a fire juggler and more.
One day, the resort allowed some of the local artisans to set up a flea market. Let me just say that you have to bargain hard and if you're not used to it, you'll either end up paying a lot more than the items are worth or not enjoying the shopping experience. It was very different from negotiating in Thailand (and I wasn't very good at that either). Still, I got... decent prices for what I bought. Makes you appreciate set prices though.


In a bit of unplanned entertainment, a mother duck and her chicks were seen swimming in the pool and wandering the grounds.

But alas, all good things must come to an end. We caught our shuttle back to the airport, where we waited in line, watching the windows computer 'error' message on the Toronto departure screen. At least the Big Ass Fans were there to keep us cool. And I mean that quite literally. We were fortunate to witness a nice sunset from the plane and arrived back home without problems.

Thursday, March 10, 2011

Punta Cana - Food

Let's talk about food. It doesn't matter how pretty the resort is, if the food's terrible it's not worth the money. People on TripAdvisor had alternating ratings with regards to the food. I heard a few people complain about it while I was there, but I actually loved the food. There was always a huge variety at the buffet, the restaurants had good food, but generally smaller portions. Ok, their sushi bar was kind of weird (pineapple sushi anyone?). On the whole though, I loved the food and loved not having to cook the food and getting the chance to try new things.

Their breakfast bar included omlet and crepe stations, cereal, fresh juices, hot chocolate (theirs is much richer tasting than ours), breads and sandwich additions. And let's not forget the pastries with chocolate to dribble over them and exotic (for us) fruits in syrup. And the not quite breakfast foods (mashed potatoes come to mind).
There were two buffet locations for lunch. The main buffet (Flavors) and See & Sea, by the beach. They had pasta stations, fresh salads, nachos, pizzas and desert spreads. One day they even had a barbecue with live music on the beach.

For dinner, the buffet was always themed, with a VERY high variety of offerings and some nifty decorations. Not sure what the 'American sauce' they put on the mahi mahi was (and chose not to try it to find out).

There were several a la carte restaurants, Italian, steakhouse, Japanese, French and seafood. Only the French and Japanese teppenyaki tables needed reservations. We tried all but the French restaurant. For people staying up late, there was even a fast food place open all night.

I ate a LOT more than I should have on this trip. And I seriously miss the buffet breakfasts.

Wednesday, March 09, 2011

Punta Cana - Beach and Pool

Of course you can't spend all your vacation admiring the buildings or sitting in your room - however nice they all are. So, it was off to the beach. I bought an Olympus Stylus Tough camera for this trip, which can go underwater! I had to learn a few tricks on the trip, which was unfortunate (as my photos before I learned the tricks weren't as good as the ones I took afterwards), but it was nice being able to take photos everywhere, even in the water.

As I said yesterday, the beach was made up of fine white sand. The different resorts all had roped off areas for their guests, with occasional free areas where natives offered boat rides, parasailing and other services. And the area closest to the water is free for everyone to walk, so you can wander for hours down the beach...

Our resort (and this was not true of all of them, as I learned later) had a large number of shade palapas, palm trees and lounge chairs. It also had a beach bar service and a nearby bar/lunch & snack restaurant (at night it was the seafood restaurant). The stretch was also long enough that if you didn't want to join in the activities (at one side), you could read in relative quiet elsewhere. There were also geckos that came by your chair looking for food. One day we walked down the beach for over an hour and came to an area of shops on the beach. It had much better prices (and more reasonable starting points) than the people selling on the beach and the flea market that came to our resort.
After I'd gotten a decent sunburn that first day on the beach, I decided a day at the pool would be nice. There were 3 pool bars, two dry (spaced a ways apart) and one wet bar. A separate kids pool was supposed to keep the noise down (though there was only 1 noisy kid there when we were, and he stayed by our side of the pool, unfortunately).
The pool was lagoon style, with swim up rooms along one side and several bridges to cross over/under. A fountain on one end and 'jacuzzi' (it was jetted but not heated) in the middle made it varied and fun to swim in. And it was gorgeous to look at.
It was especially beautiful at night.