Friday, April 22, 2011

Stamping

I picked up a lot of new stamps and equipment at the Creativ Festival, so I figured I'd try them out.  The Local King Rubber Stamps booth had a great demonstrator showing off their stamps.  Unlike regular stamps that give an outline which you then colour in, these stamps are designed to be coloured on, so the colours are blended on the stamp to create great images on their glossy paper.  Alas, I should know better than to believe things are as easy as expo demonstrators make them out.  They said you can use any markers, which is true - to a point.  I bought some water based markers at another book (Stampin' Up) and some Copic markers to fill in the colour gaps from the set.  Now, Copic markers are alcohol based, which means they dry faster than water based when applied to stamps, and the colours don't wash off.  (You can tell I'm new to the idea of colouring directly on the stamps.  It never occurred to me to make sure the markers weren't permanent before I used them.)

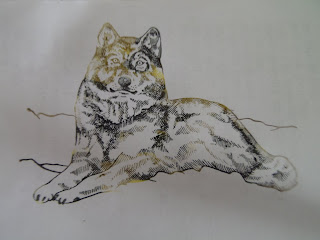
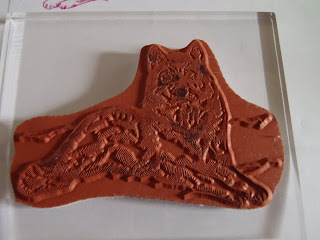
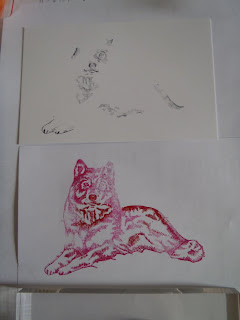
Here's what my stamp looked like when I was done trying to do my first picture.  You can still see the black marker around one eye and the nose.  That's all that made the glossy paper (see the stamp below).

So I did an experiment.  I used the same stamp and tried it with my water based markers (the pink/red wolf).  Much better, but not quite what I want in a wolf.

So I tried a third attempt.  I used some cheap dollar store markers, the yellow, orange, brown and black (you always want to go light to dark or you'll ruin your markers).  Not bad, but not quite card quality either.  I'll have to invest in another set of water based markers, with earth tones (rather than the colour set I got, which should be great for birds, butterflies and flowers).  I still noticed that the lighter colours had faded by the time I stamped the card.  Maybe that's why the demonstrator emphasized that you don't have to look at what you're doing when you colour.  You colour faster that way and end up with more ink still on the stamps when you stamp your page.

Compare that with the results of the rose stamp I got at the Stampin' Up booth.  I used pigment dyes I bought as a 4 set (2 reds, green and gold) at another booth (I don't remember which booth this was, though I suspect it was either Art Tales or Memory Keeper.  I bought a bunch of stuff there, including the Vanilla Smooch Spritz used to give the finished card a sparkly sheen).  

My rose set is designed to have each picture stamped twice, once for the base, and again for the highlights.  It was quick and easy and worked perfectly both times (though with the stamps having wood backing you have to watch your placing carefully or they won't line up).  I did the main rose twice, then layered it over the sparkly background.
I'm hoping with practice I'll get better with the marker stamps.  When done well they look fantastic.

A few hours after doing this post (set to publish the following day), I decided to do a search for the marker tip sheet the woman at Stampin' Up said she'd send me if I emailed.  I was correct in thinking the search would be easier.  And I found it.  It's a pdf file you can download here. (Or you can do a search for "Stampin Up marker tip sheet", it's the fifth result).  The first result, Using Markers - Stampin' Up is the one that taught me the best tip though:
3. Breathe on the inked image to remoisten the ink before stamping onto paper. 
Such an easy trick!  And it works.  So you don't have to colour fast to get good inked images.  Just breathe on the stamp to make the ink wet again.  I tried a few of my stamps to practice.  Here are the results.  Much better.  Now I just need black, grey and earth tone water based markers and I'm in business.   :)
Thursday, April 21, 2011

Creativ Festival Report

So, I went to the Creativ Festival in Mississauga on the weekend.  There were a decent number of booths with a variety of focuses - knitting, crocheting, stamping/cardmaking/scrapbooking, seweing maching embroidery and more.  The free classes weren't as good as I'd hoped, but I did have fun at the one make 'n take class I went to (where I made the 'laugh' card in the 'things I bought' photo).


One of the coolest things there was a booth demonstrating the Turkish art of Ebru.  For $7 you could try it and take your piece home.  Here's the one I did:

Ultimately I had a good two days, and came away with some new techniques.

Thursday, April 14, 2011

Creativ Festival

I'm heading to the Crativ Festival this Friday and Saturday.  Should be a ton of fun.  I hope to learn a bunch of new sewing and card crafting tricks.  :)  I'll try to post some photos next week.

Wednesday, April 13, 2011

Sewing Book Review: Illustrated Guide to Sewing: Garment Construction, edited by Peg Couch

Pros: step-by-step colour photos for everything, left and right handed instructions for hand sewing, progresses through basics to quite advanced techniques

Cons: some later instructions may be hard to follow without referring to the accompanying photos and even the glossary

The Illustrated Guide to Sewing: Garment Construction is a great guide for beginner and intermediate sewers who want to give their sewing a more professional look.  It starts with the basics, touching briefly on some machine and hand sewing techniques, fabric preparation and essential notions.  It assumes some knowledge and suggests reading through your sewing machine guide if you're a complete beginner before starting with this book.

This book teaches garment construction specifically.  From the hand stitching techniques of basting (to check fit before sewing) to hemming, the book moves on to the correct construction order for garments and then to professional style finishing techniques.

Each set of instructions is accompanied by a series of full colour photographs with the different steps numbered for reference.  The photos certainly help with clarity.  Actual beginners will find themselves flipping to the glossary at the back of the book and to earlier sections where some procedures are given in more detail.  I imagine many of the techniques taught (as with everything skill related) take time and practice to master.

The book recommends taking extra time with pre-sewing adjustments to ensure that you only sew once to create flattering, well constructed garments.  And this is certainly a great book to help you achieve your sewing goals.